PPGbubbles
Well-Known Member
I have been using this method for about a month and a half and I am in love!
I have the convenience of a wig, in that, I can take it off and moisturize
my hair or simply switch up my style at will. I also still have the
blending benefits of a weave, which I personally prefer.
I recently discovered that the youtube information for the quickweave
has been removed so that the original poster could persue a business venture.
Kudos to her") I benefited from the videos while they were posted and I
I benefited from the videos while they were posted and I
wanted to share with the ladies of LHCF!
I created a little pictorial to show how the quickweave is contructed and
how I apply it.
First a brief description of how I made the quickweave:
-1st I Sealed the hair using dritz fray check
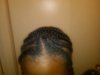
-I sewed my hair into beehive and left out my normal U-shaped part.
-I placed the cap over my head and began to sew in the same manner
I would my usual install.
-With each row I used single stitches to get the placement of the track just right
then I would remove the cap place on my foam head and sew the track down securely.
-I sewed the the hair around on the mesh cap to align with
the part I created.
-I made sure to really reinforce the stitches around the U.
and I then cut out the remaining mesh.
-I sealed the mesh and stitches around the part with dritz fray check
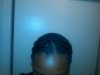
-In the opening of the U-part I used the clear fishing line to bridge
the gap created by cutting the part out.
-The fishing line lies flush with your
scalp and make for easy application and removal. and is pretty much undetectable
Enjoy the pitchas/Pictorial! This is my first one so if I am unclear let me know I hope I dont confuse anyone
I also have a LHCF abulm dedicated to the quickweave system:
http://www.longhaircareforum.com/members/90645-albums6634.html
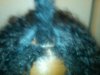
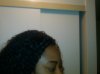
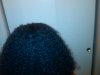
quick weave 1-you can see the fishing line against my hand
quick weave 2- foam head (decorated by a 10 year old)
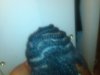
quick weave 3- back of the weave
quick weave 4- back/top
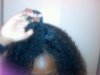
quick weave 5- be hive with wet leave out hair
I have the convenience of a wig, in that, I can take it off and moisturize
my hair or simply switch up my style at will. I also still have the
blending benefits of a weave, which I personally prefer.
I recently discovered that the youtube information for the quickweave
has been removed so that the original poster could persue a business venture.
Kudos to her
I benefited from the videos while they were posted and I wanted to share with the ladies of LHCF!
I created a little pictorial to show how the quickweave is contructed and
how I apply it.
First a brief description of how I made the quickweave:
-1st I Sealed the hair using dritz fray check
-I sewed my hair into beehive and left out my normal U-shaped part.
-I placed the cap over my head and began to sew in the same manner
I would my usual install.
-With each row I used single stitches to get the placement of the track just right
then I would remove the cap place on my foam head and sew the track down securely.
-I sewed the the hair around on the mesh cap to align with
the part I created.
-I made sure to really reinforce the stitches around the U.
and I then cut out the remaining mesh.
-I sealed the mesh and stitches around the part with dritz fray check
-In the opening of the U-part I used the clear fishing line to bridge
the gap created by cutting the part out.
-The fishing line lies flush with your
scalp and make for easy application and removal. and is pretty much undetectable
Enjoy the pitchas/Pictorial! This is my first one so if I am unclear let me know I hope I dont confuse anyone
I also have a LHCF abulm dedicated to the quickweave system:
http://www.longhaircareforum.com/members/90645-albums6634.html
quick weave 1-you can see the fishing line against my hand
quick weave 2- foam head (decorated by a 10 year old)
quick weave 3- back of the weave
quick weave 4- back/top
quick weave 5- be hive with wet leave out hair
Attachments


Last edited:


 so appreciated!
 Much appreciated!